


Building a compact backyard putting green lets you practice golf in a limited space. This guide explains how to optimize a small area, select suitable artificial turf, and follow practical installation steps. You will find design options, maintenance requirements, and realistic trade-offs to help you plan a functional and attractive green space that fits your yard and goals.
Maximizing Limited Space
Start by mapping available areas and prioritizing usable surface area. Small greens rely on efficient layouts, clear sight lines, and placement that supports playability without wasting space.
- Utilization of Available Space: Identify areas in your backyard that can be transformed into putting greens, such as unused corners or side yards.
- Multi-Functionality of Design: Consider designs that serve multiple purposes, such as incorporating seating areas or landscaping features around the putting green.
- Choosing Compact Formats: Opt for compact designs with fewer holes and shorter putts that still provide a fun golfing experience.
Apply these strategies to create a compact, multi-use green that remains functional. For product options and specifications, see Artificial Turf Express products.
Selecting Appropriate Materials
Material choice determines play quality and service life. Artificial turf requires less upkeep than natural grass and offers consistent roll and surface stability when specified correctly.
- Types of Turf Materials: Select turf that mimics natural grass yet resists wear and tear. Options include polyethylene fibers.
- Infill Options and Their Benefits: Infill materials, such as rubber or sand, can provide cushioning and stability. Choosing the right infill enhances the playing experience on your green.
- Importance of Quality and Durability: High-quality artificial turf materials can withstand different weather conditions and usage frequencies.
Compare fiber composition, pile height, and tuft density when evaluating suppliers. For access to specialist turf options and detailed specifications, consult Artificial Turf Express.
| Product Type | Feature | Benefit |
|---|---|---|
| Polyethylene Turf | UV Protection | Looks pristine in sunlight |
| Infill Material | Shock Absorption | Offers a softer landing for balls |
Choosing durable materials and the correct infill preserves play characteristics and appearance across seasons.
Planning Effective Layouts
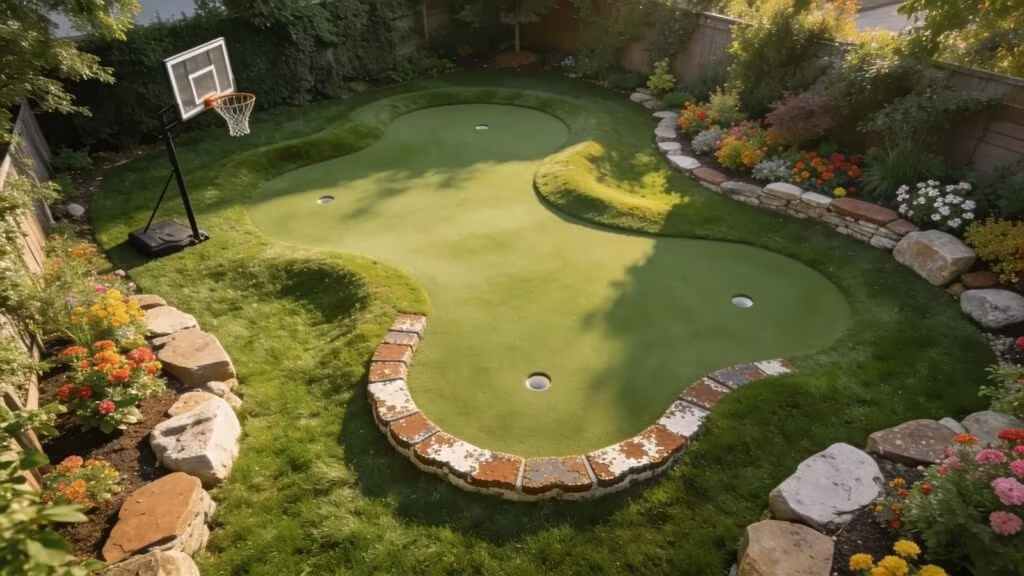
Layout determines challenge and usability. Plan hole positions, sightlines, and transitions so the green offers varied putts while fitting the available footprint.
- Effective Hole Placement: Positioning holes at varying levels of difficulty helps keep the putting green engaging.
- Site Assessment for Drainage: Assess the site for natural drainage to avoid water pooling.
- Sun Exposure Considerations: Ensuring that parts of the green receive adequate sunlight can enhance turf growth and longevity.
Careful layout planning balances playability, drainage, and integration with existing landscaping to make the most of limited space.
Installation Tips
Correct installation preserves turf performance. Focus on sub-base preparation, edge restraint, and secure seam joins to maintain a flat, true surface.
- Ground Preparation Techniques: Clear the selected area of debris and level the soil to prevent uneven surfaces.
- Securing and Caring for Turf: After installation, ensure the turf is properly secured. Use stakes and glue to anchor the turf effectively.
- Maintenance Suggestions: Regularly check for debris and pests. Clean the surface periodically to maintain playability.
Follow detailed preparation and anchoring procedures to achieve a consistent roll and minimize future repairs.
What Are the Benefits and Constraints of Small Backyard Putting Greens?
Small putting greens provide convenient practice, low-maintenance recreation, and potential property enhancement; however, they require careful design trade-offs given limited space and upfront costs.
Benefits
- Space Utilization Importance: With thoughtful design, even the smallest backyard can accommodate a putting green that enhances outdoor enjoyment.
- Maintenance Considerations: Artificial turf significantly reduces the time and costs associated with maintaining a natural lawn.
Constraints
- Space Limitations: Not all backyards have enough space for a functional putting green.
- Installation Challenges: Ground conditions may complicate installation, requiring professional assistance to achieve optimal results.
Recognizing benefits and constraints early lets you select a design and material specification that meets both performance and budget requirements.
How Can Artificial Turf Optimize Limited Backyard Space?
Artificial turf adapts to constrained sites by providing a consistent putting surface with minimal maintenance and reliable ball roll compared with variable natural turf.
Versatility of Installation
Turf can be installed on compact, uneven, or sloped areas when the sub-base and drainage are configured correctly, expanding placement options.
Design Advantages of Turf
Well-specified turf defines play areas and integrates with landscaping while maintaining consistent speed and surface integrity.
Examples of Successful Implementations
Homeowners often combine putting greens with play or seating zones to maximize the use of limited yards. For project inquiries or customized specifications, see the Artificial Turf Express contact page.
What are the common challenges in Small Putting Green Installation?
Installations commonly face space constraints, variable ground conditions, and budget pressures that affect material choices and quality.
- Space Limitations: Finding adequate space that allows for a functional design can be tricky, especially in urban environments.
- Initial Costs Involved: High-quality materials and professional installation can add costs that may not be easily affordable for everyone.
- Installation Challenges: Variations in soil conditions can complicate installation, requiring specialized techniques in certain areas.
Address these challenges through precise site assessment, realistic budgeting, and, where needed, professional support to ensure functional results.
Which Types of Artificial Turf Are Best Suited for Small Putting Greens?
Select turf designed for putting surfaces; products vary by durability, aesthetics, and maintenance needs. Match the turf specification to the expected use frequency.
Durability and Maintenance Needs
Choose based on expected foot traffic and maintenance capacity; options such as polyethylene provide an excellent appearance and a natural feel, while other synthetic materials offer high resilience under pressure.
Long-Term Performance and Efficiency
Investing in high-quality synthetic turf maximizes the duration between replacements and streamlines your weekly yard care routine, ensuring the green remains a low-effort landscape feature.
Technical Specifications
Evaluate pile height, tuft density, and UV resistance when comparing products—these parameters affect ball roll, wear resistance, and color retention.
How to Effectively Plan and Design a Compact Backyard Putting Green?
Use a stepwise design process: assess the site, define play goals, select materials, and detail drainage and edge restraint before installation.
- Integration with Landscape: Incorporate the putting green design with surrounding features to blend harmoniously into the outdoors.
- Custom Layouts: Personalize layouts to match your backyard’s unique shape and dimensions.
- Effective Maintenance Strategies: Develop a maintenance plan to simplify upkeep for long-term enjoyment.
Following a structured plan reduces surprises during installation and ensures the finished green meets performance expectations.
What Are Space Optimization Techniques for Small Putting Greens?
Apply precise measurements, consider tiered or raised elements, and design multi-use areas to increase usable surface without expanding footprint.
- Measuring and Shaping Options: Determine the exact dimensions required for functionality and fit to allow for precise installation.
- Using Vertical Space: Incorporating raised features or tiered designs can add interest to the putting green while maximizing playable area.
- Multi-Functionality Design: Design the green as a multi-purpose area that can be used for gatherings and other activities.
These optimization techniques help you retain play quality while making the most of limited yard space.
Which Layout Shapes and Design Elements Enhance the Usability of Small Putting Greens?
Shape and features influence play. Choose forms and contours that maximize usable surface and deliver varied, engaging putts.
Shape Benefits
Circular or oval layouts often provide the largest continuous surface within constrained dimensions, improving play options.
Functional Features
Incorporate subtle slopes or small bunkers to introduce challenge and replicate on-course conditions without requiring large areas.
Aesthetic Integration
Use adjacent planting and hardscape to frame the green, so it appears as an integrated landscape element rather than an isolated feature.
What Are the Step-by-Step DIY Installation Procedures for Small Putting Greens?
A methodical DIY approach yields the best results: plan, prepare the base and drainage, lay and secure the turf, then finish with appropriate infill and edges.
- Planning and Design: Begin with a clear plan and layout design tailored to your yard’s specific dimensions.
- Ground Preparation: Clear and level the ground where the green will be installed, ensuring proper drainage.
- Installation Process: Roll out the turf, secure it properly, and carefully add any infill needed to complete the surface.
Careful adherence to each installation step will produce a durable, consistent surface comparable to professional results.
Which Tools and Materials Are Required for Efficient Installation?
Have the right tools and consumables on hand: excavation and leveling tools, edging, turf, suitable infill, and adhesives or joining tape for seams.
- Essential Tools: A shovel, rake, and turf cutter are necessary for preparing the site.
- Required Materials: Consider the turf itself, infill options, and adhesives for securing the edges.
Proper preparation and procurement reduce delays and help ensure the installed green performs as intended.
How Long Does Installation Typically Take and What Are Expert Tips?
Typical installation for a small putting green takes one to two days, depending on site prep complexity and installer experience.
Installation Timeline
Allow several hours for base preparation and grading, then one to two days for turf laying, seaming, and finishing work.
Expert Recommendations
Install on a calm, dry day where possible. This reduces movement during seaming and allows adhesives or infill to settle correctly.
Post-installation Care
Begin a routine inspection and light maintenance immediately after installation to correct any settling or edge issues before they worsen.
How Should Small Backyard Putting Greens Be Maintained for Longevity?
Regular, targeted maintenance preserves surface performance: routine brushing, debris removal, and prompt repair of wear areas extend useful life.
Routine Upkeep
Brush fibers periodically and remove debris to maintain consistent ball roll and prevent matting.
Seasonal Checks
Adjust maintenance with seasons—clear leaves in autumn, check drainage after heavy rain, and inspect for heat-related wear in summer.
Repair Methods
Replace or patch worn sections and re-secure seams quickly to prevent progressive damage and maintain playability.
What Cleaning and Repair Methods Are Recommended for Artificial Turf?
Use mechanical debris removal, spot cleaning, and manufacturer-recommended adhesives for repairs. For stubborn dirt, use turf-safe cleaning agents and follow product guidance.
- Debris Removal Techniques: Utilize a stiff broom or a leaf blower to keep the surface clear of leaves and dirt.
- Repair Procedures: Minor rips or tears can be patched using turf adhesive or tape designed for artificial materials.
- Supplemental Maintenance: Consider periodic shampooing to remove tougher debris and help maintain an appealing appearance.
Consistent cleaning and timely repairs maintain surface integrity and ensure reliable play characteristics over time.
Which Seasonal Maintenance Practices Support Turf Durability?
Seasonal routines protect the turf: increase debris removal in leaf seasons, ensure drainage before wet months, and monitor for freeze or heat stress as conditions change.
- Seasonal Adjustments in Care: During fall, implement measures to prevent debris buildup and ensure proper drainage during rainy seasons.
- Long-term Support for Turf: Regularly evaluating the turf’s condition and promptly addressing repairs can prevent long-term damage.
- Regular Inspections: Conduct periodic inspections for damage and wear to ensure your putting green looks and functions at its best.
Applying these seasonal checks helps retain appearance and performance year-round.
Technical Requirements and Project Complexity
The choice between DIY and professional installation depends on your proficiency with landscaping tools and earthwork. At the same time, kits provide the essential components for a self-managed project, and professional teams handle the intricate grading, drainage engineering, and precision seaming required for a tournament-grade finish.
Pros and Cons of DIY Kits
DIY lowers initial cost but may impact surface consistency if not installed precisely. Professional work increases cost but generally yields more reliable long-term performance.
Value of Professional Guidance
Consulting a professional can clarify specifications, drainage, and sub-base requirements, often preventing costly rework and improving final quality.
Frequently Asked Questions
1. How do I ensure proper drainage for my small backyard putting green?
Assess the site slope and design the green so water moves away from structures. Use a permeable sub-base—such as compacted aggregate—and consider gravel layers or a French drain where water accumulates to prevent pooling and protect turf performance.
2. How can I prevent common pests around my putting green?
Keep the area clear of organic debris and standing water, which attract pests. Use non-toxic deterrents or barriers as needed, and consult pest control professionals if infestations persist to protect both turf and surrounding landscaping.
3. What seasonal adjustments do I need to make for my putting green?
Spring: clean and inspect seams. Summer: monitor for heat-related wear and clear debris. Fall: remove leaves frequently to prevent matting. Winter: protect exposed edges from frost and check drainage after thaw cycles.
4. Can I install solar lights around my putting green for added visibility?
Yes. Select outdoor-rated, waterproof solar fixtures and position them to illuminate pathways and hole areas without casting distracting shadows on the putting surface.
5. Is it possible to customize the design of my putting green?
Yes. You can customize the shape, hole placement, and contouring to match the skill level and yard shape. Discuss specific options with a turf specialist to ensure design choices align with installation and maintenance needs.
6. What types of infill materials are best for small putting greens?
Sand infill provides firmness and true roll, while rubber offers cushioning. Blends combine support and comfort—choose based on desired ball behavior and foot feel.
7. Are there specific maintenance routines recommended for artificial turf putting greens?
Routine brushing, debris removal, and periodic inspections are essential. Use turf-safe cleaners for stubborn stains and address worn seams or patches promptly to maintain a consistent playing surface.
Conclusion
A well-planned small putting green combines appropriate turf specification, correct sub-base work, and intentional layout. By prioritizing materials, drainage, and maintenance, you can create a durable, high-performing practice surface. Begin by defining your performance goals, then select products and processes that meet those specifications to achieve the best long-term results.


